
| STORE
HOURS 9 TO 6 CDT GMT minus 5 hours Monday thru Friday Do not call on Sat. Sun. please |
Replacement Key Lever--
We now have a craftsman who can make a new key lever of kiln dried
wood.
We must have the key to the left and right of the
broken key for him to work with
as a pattern. A digital
photo of the keys showing the area of the broken key will
also help him. We will have to get a quote-- SEND
MAIL
If your key lever lays there helplessly depressed, and if it won't play at all if you lift it and push it back down, your key lever is probably broken. After opening the piano, make sure of this, and only attempt a repair if it is broken in the center.
First clean any loose shavings of wood out of the break. Try fitting it together dry to see if it will go all the way back together. If not, clean up the break some more. DO NOT seriously carve up the key trying to repair it. THERE ARE NO REPLACEMENT PARTS FOR WHOLE KEYS.
Cover all the broken exposed wood of the key with Elmer's carpenter's glue-- the murky off white stuff. Align the two ends together, and clamp it as it dries. Look it over after you clamp it to get it as true as possible lengthwise. Let it dry for at least 24 hours. Once dry, sand the sides of the key carefully and carve off all the excess glue.
Now, find something thin, flat, and rigid to laminate to one side of the key. I like to use the narrow stem piece of used ivory from a key lever. You can order them in out Online Catalog under Key Tops. Carefully put the key lever into place in the piano to see which side of the key has the widest crack which would allow space for the laminated goodie. Laminate your piece of material, with the above glue, to the side of the key across the break along the side of the key. Clamp it gently, or roll rubber bands over the repaired area to act as clamps.
After this step dries, sand it again to get off any rough or curled edges on the lamination. Put the key into the piano. It will very likely not fit perfectly. You may have to adjust it as instructed in Lost Motion Section of Chapter Seven.
RECENT OPTION: We have acquired a repair clip for key repair which replaces the lamination aspect after the initial gluing step above:
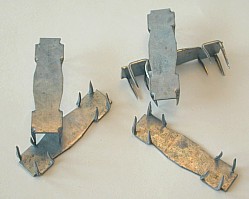
Key Lever Repair Scotch Clip
Glue the broken key back together with Elmer's Carpenter's Glue, as instructed above.
After it is dry, open the jaws of a bench vice, and hold the key lever with a clip on each side of the key lever positioned across the break. Offset the two clips so that the points will not jam each other, points against the side of the lever and on either side of the break. Have a second person slowly close the vice jaws as you steady the key lever and clips. Stop when the clips are well embedded.
For prices, go to PIANO ACTION PARTS
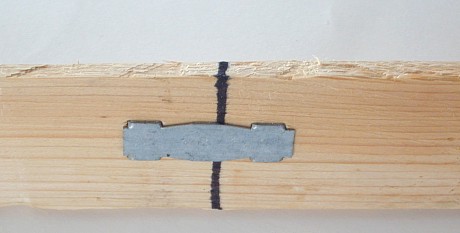
Illustration showing the Scotch Clip applied to wood. The black line represents
a break in a key lever. After gluing, the clip is applied in a bench vise, one
clip on each side of the key lever. The vise presses the clips in without hammering.
Wood glue should be used, as instructed above, for added strength. The clips are
VERY dangerous for children to play with.
There is one more thing you can do to strengthen the repaired key, but only if you are pretty mechanically literate. If you do this, do not laminate it as above until after this process. Do glue the break as above. Also, do NOT combine the Scotch clip above with this additional fix.
Look the key lever over very closely to see how you can drill a smallish hole through the break at an angle through the key. If the "key button" (the layer of wood attached over the top of the hole which has the red felt in it) is loose, gently break it on off, and glue it on again solidly. You can drill through the "key button" if it will help your work fit better.
Acquire two pins or small nails the size of your drill bit, removing the nail head, and cut them so that they will not protrude from the holes you are going to drill. Drill your holes through the break at two angles, being VERY careful that your travel, and later the pin you insert, will not get into the throw of the center pin when the key rocks!!! Read that again please. Drill all the way through the key from one side to the other at an angle. Make your angles crisscross if possible.
The two holes may have to end up about parallel, on the either extreme of the brake. Now, baptize (by Baptist immersion :-) the pins or nail pieces in Elmer's glue, and slide them into the holes. Let it dry good before re-assembly. If you miscalculated, and the center pin binds up on one of the repair pins, try bending the center pin forward of backward to give it clearance. Bend it with the key OUT of the piano so that you do not break your repair.
If a totally dead key is not broken, skip ahead and look for Jack repair or for Sticker repair. You may have action damage, or you may have a jack popped loose.
Grand Piano Key Lever Repair
The only issue on a grand piano is that the key lever is much longer than on an upright piano. It is VERY important that the glued key lever be aligned by slight positioning effort to make sure it is perfectly straight, top and side alignment. This is done best in the vise by sighting along the top, bottom, and side of the key lever to see if it is straight. It is easy to miss a slight angle across the break. This can make it very difficult to make the key lever fit in the piano later.
Other Options
There are none. Key levers are not for sale on ANY brand of piano. You must fix it, or you must manufacture a new one. I new one will very likely warp later, so do not avoid trying to do the repair on the this page.
![]()
![]()
![]()
![]()