| STORE
HOURS 9 TO 6 CDT GMT minus 5 hours Monday thru Friday Do not call on Sat. Sun. please |

61.
PLASTIC PARTS:
Vagias Elbow Replacement on a Piano ActioN
Other Plastic Parts Replacement

Vagias elbows are on hand in the catalog.
Also, we offer replacement parts for ALL 1950s plastic parts which have shattered.
![]()
|
Please read these instructions all the way through BEFORE you go to work so that you have all of your cookies in a row mentally.
During the 1950s, several piano companies went bananas over plastic. They made many of the action parts, on spinet pianos, out of plastic. It was a great idea. The cost of carving 1000 bits of wood became infinitely simpler with plastic. Plastic made of soy beans could be squirted into molds much easier. It seemed to have bean a great leap forward.
Entropy gets to all of us, right? Well, surprise, surprise, 1950s plastic aged very rapidly. Within 15 to 20 years the plastic crystallized, and the parts began to crumble. A couple of piano companies were actually driven out of business by warrantee returns.
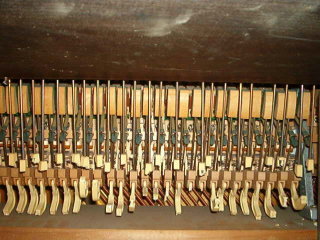
The most common plastic parts to be used were the elbows in "drop action" spinets (see illustration). If this is your problem, you have a very good friend in a man named Vagias. He invented elbows that you can use to replace your old ones, and you don't have to remove the action, AND they are made of nylon.
If you have even two or three elbows broken, it is a very poor plan to replace them all at once. You should order the whole set of Vagias elbow from my Mini Catalogue in the back of the book, and do the whole 88 keys at once. Get it over with. Also, it will cost you less in the end to order the whole set.
![]()
Once you have the new elbows, get these tools together:
A propane gas bottle with a small torch attached, a pair of needle nosed pliers, and a vacuum cleaner to clean up the mess you make.
![]()
Removing the old elbows:
 Take
the bottom board off of the piano. Plunk on some good keys to see how the action
is supposed to work. Now, get right down there on your back with your needle nosed
pliers in your hand. Start wherever you like, and grab an elbow with the needle
nosed pliers, and try to smash the plastic of the elbow just where it enters the
wooden whippen.
Take
the bottom board off of the piano. Plunk on some good keys to see how the action
is supposed to work. Now, get right down there on your back with your needle nosed
pliers in your hand. Start wherever you like, and grab an elbow with the needle
nosed pliers, and try to smash the plastic of the elbow just where it enters the
wooden whippen.
Don't twist too much, or you can break the wooden whippen. Just try to crush the plastic. It should be pretty easy. Once it has broken, grab the remains of the elbow on the end of the wire, and lift it out of its mounting point up at the back end of the key lever. Set the metal rod and elbow aside.
Next, with your needle nosed pliers, carefully crush and chew away at the remains of the elbow in the wooden whippen. DO NOT TWIST FROM SIDE TO SIDE, or you will break the pin out of its mounting in the wood. Crush the plastic by squeezing it with the pliers. Clean all of the junk plastic out of the recess in the wooden whippen. You may have to use a small tool to get the plastic trash out. Be sure the red felt piece is also removed from the pin in the wood.
Get all 88 keys done, then count your wires. If there are not 88, look in the bottom of the piano, in your pockets, in the dog's box. If one is missing, you can either invent one, or send for it from me or your tuner.
![]()
Putting on the new elbows:
Now, I give you a trade secret. Notice how the Vagias elbows have a hole where you can screw in the wire. Forget about screwing the wire in. You are going to do it the easy way, and it will be much better work when you are done.
Light your propane torch. I hope you can let it sit safely on the floor or your work bench, and just let it run on low flame. If you have a gas cook stove, you can do this at the stove, but beware of the parts when they are hot. You can end up with a melted spot on your counter top.
First, I want you to remove all of the old plastic from the wires. With your needle nosed pliers break off all of the plastic that you can. Then take the wire in the pliers, and burn off the remaining old plastic. It will melt as it burns, so be sure you are not working where the melting plastic can fall on something valuable.
Burn ALL of the old plastic off. It will all burn up, and little or no ash will be left on the wire. Do not leave any old plastic in the threads of the wire.
Second, heat the wire, holding it in the pliers, until it turns a bit blue. Have a new elbow in your other hand ready. Once the wire is hot, push it right into the hole in the top of the elbow. Stop when you see the wire bottom out in the hole. DO NOT RELAX. Hold the wire in the bottom of the hole for several seconds until the thing cools. If you let go, trapped air in the bottom of the hole will push the wire back out of the hole part way.
As you hold the wire and elbow with two hands, while waiting for it to cool, rotate the gadget to see if you have the wire coming straight up from the elbow top. Make adjustments quickly before it completely cools. Do all 88 at once because you will develop a system after you do five of ten, and your work will be neater and accurate.
![]()
After thought:
 If
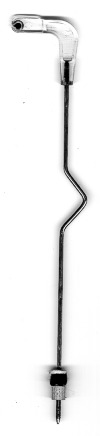
the wires have a bend in them, be sure the wire bends in the manner shown in the
illustration of the wire and elbow earlier. Get
the wire and elbow in your hands in a way that will comfortably result in the
correct wire position when you are done.
If
the wires have a bend in them, be sure the wire bends in the manner shown in the
illustration of the wire and elbow earlier. Get
the wire and elbow in your hands in a way that will comfortably result in the
correct wire position when you are done.
If you had to purchase new drop wires, you may have had to buy wires that were too long due to the limited choice of lengths available. In that case, put a bend in the drop wire as in the illustration at the right so that the length is identical to the original. Make sure to put the bend in the direction where there is clearance for the bend. This is urgent to determine if you use the heat method of assembly. You may want to add the bend after assembly so that you can get it parallel to the action parts. Use a vise to do the bending, working at the very end of the jaws of the vice.
Time for a cup of tea. Don't try to do these jobs without a break. I don't. Why rush through a job and mess it all up?
![]()
Last Step:
It is time to re-install the wires and elbows into the piano. From above, drop the wires down into the key levers. Be sure the button on the top of the wire is bottomed into the hole in the end of the key lever (or in the metal tab, if that is the way yours is made).
After all 88 are in, get down on the floor again, and start pushing the Vagias elbows into the wooden whippen. Check each elbow before you insert it to be sure the red felt in the hole is cut and positioned right to allow the pin to enter the hole. If it isn't, use a knife blade or your fingernail to clear the hole a bit.
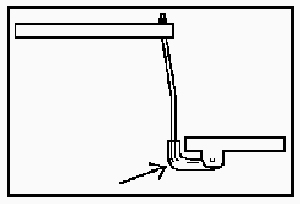
Be sure the hole in the elbow (see illustration) is lined up right with the metal pin before you push on it. Steady the wooden whippen with your free hand. Also make sure none of your wires are crossed (no pun intended). If you cross any, you will find it quick enough. When the piano is played, two keys will play the wrong note. It is no trick to remove the two elbows involved, and correct the problem.
After you are done, eye ball the elbows. If there is one that seems to be out a bit from the others, it is probably because the hole in the elbow is not bottomed onto the pin in the whippen. Push it in.
You have really made a mess, right? Better clean it all up before the last cup of tea. The lady of the house will like that.
![]()
Adjustment:
You will now see from up above that the hammers are all over the place. Some will be clear up off of the hammer back rest, while others feel real sloppy when the key is pushed down.
Start from one end, and turn the wooden or rubber button on the top of the wire until the hammer is just at rest on the hammer back rest. BUT do not leave the hammer so that, when you can push the key part way down, the hammer doesn't take right off. If you have ever tuned a short wave radio, you will catch on to this right away. For more detail on this job, See Lost Motion Adjustment.
If you have the rubber buttons, they may be in bad condition. They may also be mounted in a metal tab that protrudes from the back end of the key lever. If you can see that they will not stay in place after you adjust them, give them a dab of GE Silicone glue at the very end of the work process. This can later be peeled off for further repair, but it will hold in the meantime.
![]()
Look there now, you did it, and you saved about $100 over a piano technician's bill. Some tuners charge horrible rates for this job because they know that you HAVE to do it. If you are a sho nuf Baptist, you can start shouting, "Praise the Lord." I guess you New Agers will have to settle for a cup of camomile tea. Ho hum, but ain't it a nice feeling?
![]()
Until the new elbows come in the mail:
You ordered the Vagias elbows, but you want to play the piano in the meantime, right? Well, take off the lower board, and get down there with a cigarette lighter (no cigarette, stupid. Why should you add cancer to your troubles?). Melt the two broken ends of the elbow at the same time, drop the lighter down the neck of your shirt, and push the two elbow ends together. This usually works and holds for a few days. DO NOT try to glue them. Nothing works.
Other Plastic Parts in Uprights
![]()


 On to task 62
BACK TO PIANO TITLE PAGE
![]()